微信小程序中如何获取短信验证码登录的?以下代码详细解说了,分享给大家参考,看看下图的效果,后面将系统介绍短信验证码实现流程。
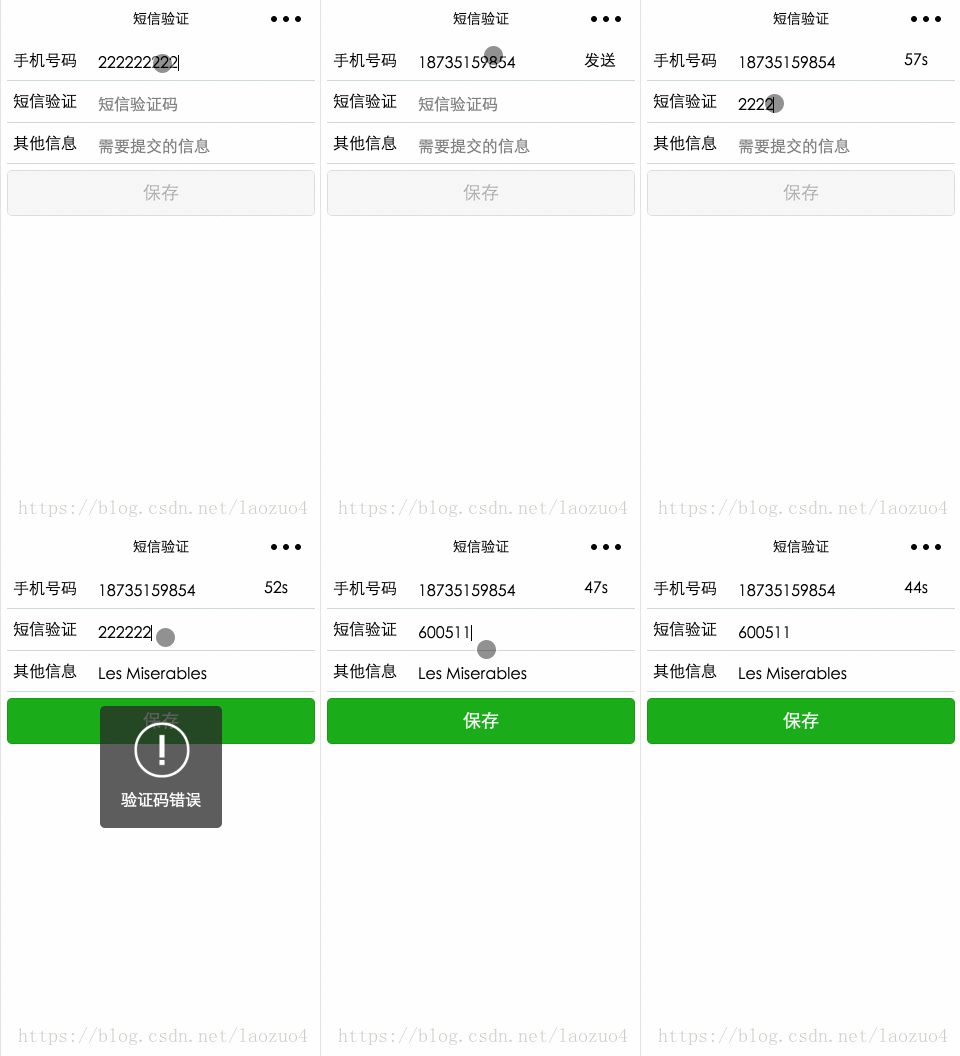
我是java开发者,后端使用了springmvc
短信验证码实现流程
1、构造手机验证码,生成一个6位的随机数字串;
2、使用接口向短信平台发送手机号和验证码,然后短信平台再把验证码发送到制定手机号上
3、将手机号验证码、操作时间存入session中,作为后面验证使用;
4、接收用户填写的验证码、手机号及其他注册数据;
5、对比提交的验证码与session中的验证码是否一致,同时判断提交动作是否在有效期内;
6、验证码正确且在有效期内,请求通过,处理相应的业务。
小程序代码
info.wxml
<!--info.wxml-->
<view class="container">

<view class="section">
<text>手机号码</text>
<input placeholder="请输入手机号码" type="number" maxlength="11" bindinput="inputphonenum" auto-focus />
<text wx:if="{{send}}" class="sendmsg" bindtap="sendmsg">发送</text>
<text wx:if="{{alreadysend}}" class="sendmsg" bindtap="sendmsg">{{second+"s"}}</text>
</view>

<view class="section">
<text>短信验证</text>
<input placeholder="短信验证码" type="number" bindinput="addcode" />
</view>

<view class="section">
<text>其他信息</text>
<input placeholder="需要提交的信息" bindinput="addotherinfo" />
</view>

<button type="{{buttontype}}" disabled="{{disabled}}" bindtap="onsubmit">保存</button>

</view>
登录后复制
info.js
// info.js
const config = require('../../config/config.default.js')

page({
  data: {
    send: false,
    alreadysend: false,
    second: 60,
    disabled: true,
    buttontype: 'default',
    phonenum: '',
    code: '',
    otherinfo: ''
  },
  onready: function () {
    wx.request({
      url: `${config.api + '/getsessionid.html'}`,
      header: {
        "content-type": "application/x-www-form-urlencoded"
      },
      method: 'post',
      success: function (res) {
        wx.setstoragesync('sessionid', 'jsessionid=' + res.data)

      }
    })
  },
// 手机号部分
  inputphonenum: function (e) {
    let phonenum = e.detail.value
    if (phonenum.length === 11) {
      let checkednum = this.checkphonenum(phonenum)
      if (checkednum) {
        this.setdata({
          phonenum: phonenum
        })
        console.log('phonenum' + this.data.phonenum)
        this.showsendmsg()
        this.activebutton()
      }
    } else {
      this.setdata({
        phonenum: ''
      })
      this.hidesendmsg()
    }
  },

  checkphonenum: function (phonenum) {
    let str = /^1d{10}$/
    if (str.test(phonenum)) {
      return true
    } else {
      wx.showtoast({
        title: '手机号不正确',
        image: '../../images/fail.png'
      })
      return false
    }
  },

  showsendmsg: function () {
    if (!this.data.alreadysend) {
      this.setdata({
        send: true
      })
    }
  },

  hidesendmsg: function () {
    this.setdata({
      send: false,
      disabled: true,
      buttontype: 'default'
    })
  },

  sendmsg: function () {
    var phonenum = this.data.phonenum;
    var sessionid = wx.getstoragesync('sessionid');
    wx.request({
      url: `${config.api + '/sendsms.html'}`,
      data: {
        phonenum: phonenum
      },
      header: {
        "content-type": "application/x-www-form-urlencoded",
        "cookie": sessionid
      },
      method: 'post',
      success: function (res) {
        console.log(res)
      }
    })
    this.setdata({
      alreadysend: true,
      send: false
    })
    this.timer()
  },

  timer: function () {
    let promise = new promise((resolve, reject) => {
      let settimer = setinterval(
        () => {
          this.setdata({
            second: this.data.second - 1
          })
          if (this.data.second <= 0) {
            this.setdata({
              second: 60,
              alreadysend: false,
              send: true
            })
            resolve(settimer)
          }
        }
        , 1000)
    })
    promise.then((settimer) => {
      clearinterval(settimer)
    })
  },

// 其他信息部分
  addotherinfo: function (e) {
    this.setdata({
      otherinfo: e.detail.value
    })
    this.activebutton()
    console.log('otherinfo: ' + this.data.otherinfo)
  },

// 验证码
  addcode: function (e) {
    this.setdata({
      code: e.detail.value
    })
    this.activebutton()
    console.log('code' + this.data.code)
  },

 // 按钮
  activebutton: function () {
    let {phonenum, code, otherinfo} = this.data
    console.log(code)
    if (phonenum && code && otherinfo) {
      this.setdata({
        disabled: false,
        buttontype: 'primary'
      })
    } else {
      this.setdata({
        disabled: true,
        buttontype: 'default'
      })
    }
  },

  onsubmit: function () {
    var phonenum = this.data.phonenum;
    var code = this.data.code;
    var otherinfo = this.data.otherinfo;
    var sessionid = wx.getstoragesync('sessionid');
    wx.request({
      url: `${config.api + '/addinfo.html'}`,
      data: {
        phonenum: phonenum,
        code: code,
        otherinfo: otherinfo
      },
      header: {
        "content-type": "application/x-www-form-urlencoded",
        "cookie": sessionid
      },
      method: 'post',
      success: function (res) {
        console.log(res)

        if ((parseint(res.statuscode) === 200) && res.data.message === 'pass') {
          wx.showtoast({
            title: '验证成功',
            icon: 'success'
          })
        } else {
          wx.showtoast({
            title: res.data.message,
            image: '../../images/fail.png'
          })
        }
      },
      fail: function (res) {
        console.log(res)
      }
    })
  }
})
需要注意的是小程序没有session的概念,所以我们需要虚拟出http的session:
1) 在onready获取服务器端的sessionid, 并存储到本地缓存中
2) 每次发起http请求时在header中构造: "cookie": sessionid
服务器端代码
1. 获取sessionid
/**
	 * 获得sessionid
	 */
	@requestmapping("/getsessionid")
	@responsebody
	public object getsessionid(httpservletrequest request) {
		try {
			httpsession session = request.getsession();
			return session.getid();
		} catch (exception e) {
			e.printstacktrace();
		}
		return null;
	}
2. 发送短信验证码
/**
	 * 发送短信验证码
	 * @param number接收手机号码
	 */
	@requestmapping("/sendsms")
	@responsebody
	public object sendsms(httpservletrequest request, string phonenum) {
		try {
			jsonobject json = null;
			//生成6位验证码
			string verifycode = string.valueof(new random().nextint(899999) + 100000);
			//发送短信
			zhenzismsclient client = new zhenzismsclient("你的appid", "你的appsecret");
			string result = client.send(phonenum, "您的验证码为:" + verifycode + ",该码有效期为5分钟,该码只能使用一次!【短信签名】");
			json = jsonobject.parseobject(result);
			if(json.getintvalue("code") != 0)//发送短信失败
				return "fail";
			//将验证码存到session中,同时存入创建时间
			//以json存放,这里使用的是阿里的fastjson
			httpsession session = request.getsession();
			json = new jsonobject();
			json.put("verifycode", verifycode);
			json.put("createtime", system.currenttimemillis());
			// 将认证码存入session
			request.getsession().setattribute("verifycode", json);
			return "success";
		} catch (exception e) {
			e.printstacktrace();
		}
		return null;
	}
3. 提交信息并验证短信验证码 apache php mysql
/**
	 * 注册
	 */
	@requestmapping("/addinfo")
	@responsebody
	public object addinfo(
			httpservletrequest request,
			string phonenum,
			string code,
			string otherinfo) {
		jsonobject json = (jsonobject)request.getsession().getattribute("verifycode");
		if(!json.getstring("verifycode").equals(code)){
			return "验证码错误";
		}
		if((system.currenttimemillis() - json.getlong("createtime")) > 1000 * 60 * 5){
			return "验证码过期";
		}
		//将用户信息存入数据库
		//这里省略
		return "success";
}【说明】:本文章由站长整理发布,文章内容不代表本站观点,如文中有侵权行为,请与本站客服联系(QQ:254677821)!