

                #import <UIKit/UIKit.h>

@interface NameAndColorCellTableViewCell : UITableViewCell

@property(copy,nonatomic) NSString *name;
@property(copy,nonatomic) NSString *color;

@end
                //
                //
                  NameAndColorCellTableViewCell.m

                //
                  Tabel Cells

                //
                //
                  Created by  Jierism on 16/7/21.

                //
                  Copyright ? 2016年  Jierism. All rights reserved.

                //

                #import
                "
                NameAndColorCellTableViewCell.h
                "
                @interface
                 NameAndColorCellTableViewCell ()


                //
                 定义两个属性变量
@property(strong,nonatomic) UILabel *nameLabel;
@property(strong,nonatomic) UILabel *colorLabel;

@end@implementation NameAndColorCellTableViewCell

- (void)awakeFromNib {
    [super awakeFromNib];
    // Initialization code}

- (void)setSelected:(BOOL)selected animated:(BOOL)animated {
    [super setSelected:selected animated:animated];

    // Configure the view for the selected state}

- (instancetype)initWithStyle:(UITableViewCellStyle)style reuseIdentifier:(NSString *)reuseIdentifier
{
    self = [super initWithStyle:style reuseIdentifier:reuseIdentifier];
    if (self) {
        // 初始化代码
        // 往表单元里面添加子视图
        // 这里在每个表单元里添加了四个Label
        CGRect nameLabelRect = CGRectMake(0, 5, 70, 15);
        UILabel *nameMaker = [[UILabel alloc] initWithFrame:nameLabelRect];
        nameMaker.textAlignment = NSTextAlignmentRight;  // 右对齐
        nameMaker.text = @"Name:";
        nameMaker.font = [UIFont boldSystemFontOfSize:12];
        [self.contentView addSubview:nameMaker];

        CGRect colorLabelRect = CGRectMake(0, 26, 70, 15);
        UILabel *colorMaker = [[UILabel alloc] initWithFrame:colorLabelRect];
        colorMaker.textAlignment = NSTextAlignmentRight;
        colorMaker.text = @"Color:";
        colorMaker.font = [UIFont boldSystemFontOfSize:12];
        [self.contentView addSubview:colorMaker];

        CGRect nameValueRect = CGRectMake(80, 5, 200, 15);
        self.nameLabel = [[UILabel alloc] initWithFrame:nameValueRect];
        [self.contentView addSubview:_nameLabel];

        CGRect colorValueRect = CGRectMake(80, 25, 200, 15);
        self.colorLabel = [[UILabel alloc] initWithFrame:colorValueRect];
        [self.contentView addSubview:_colorLabel];

    }
    return self;
}

// 重写了Name和Color的set方法,当传递一个新的值时,更新标签的额内容
- (void) setName:(NSString *)n {
    if (![n isEqualToString:_name]) {
        _name = [n copy];
        self.nameLabel.text = _name;
    }
}

- (void)setColor:(NSString *)c {
    if (![c isEqualToString:_color]) {
        _color = [c copy];
        self.colorLabel.text = _color;
    }
}

@end
                #import <UIKit/UIKit.h>

@interface ViewController : UIViewController<UITableViewDataSource>

@end
                //
                //
                  ViewController.m

                //
                  Tabel Cells

                //
                //
                  Created by  Jierism on 16/7/20.

                //
                  Copyright ? 2016年  Jierism. All rights reserved.

                //

                #import
                "
                ViewController.h
                "
                #import
                "
                NameAndColorCellTableViewCell.h
                "
                static NSString *CellTableIdentifier = @"CellTableIdentifier";

@interface ViewController ()

// 定义一个数组和输出接口
@property (copy,nonatomic) NSArray *computers;
@property (weak,nonatomic) IBOutlet UITableView *tableView;

@end@implementation ViewController

- (void)viewDidLoad {
    [super viewDidLoad];
    // Do any additional setup after loading the view, typically from a nib.

    // 往数组里定义字典
    self.computers = @[@{@"Name" : @"MacBook Air",@"Color" : @"Sliver"},
                       @{@"Name" : @"MacBook Pro",@"Color" : @"Sliver"},
                       @{@"Name" : @"iMac",@"Color" : @"Sliver"},
                       @{@"Name" : @"Mac Mini",@"Color" : @"Sliver"},
                       @{@"Name" : @"Mac Pro",@"Color" : @"Black"},];
    [self.tableView registerClass:[NameAndColorCellTableViewCell class] forCellReuseIdentifier:CellTableIdentifier];
}

- (void)didReceiveMemoryWarning {
    [super didReceiveMemoryWarning];
    // Dispose of any resources that can be recreated.}


// DataSource方法

// 返回数组元素个数的行数,这里return的数不能大于元素的个数,否则崩溃
- (NSInteger)tableView:(UITableView *)tableView numberOfRowsInSection:(NSInteger)section
{
    return [self.computers count];
}

- (UITableViewCell *)tableView:(UITableView *)tableView cellForRowAtIndexPath:(NSIndexPath *)indexPath
{
    NameAndColorCellTableViewCell *cell = [tableView dequeueReusableCellWithIdentifier:CellTableIdentifier forIndexPath:indexPath];

    NSDictionary *rowData = self.computers[indexPath.row];

    cell.name = rowData[@"Name"];
    cell.color = rowData[@"Color"];

    return cell;
}

@end
以上代码手动实现了在表单元中添加了4个Label,并显示相关内容,运行效果如图
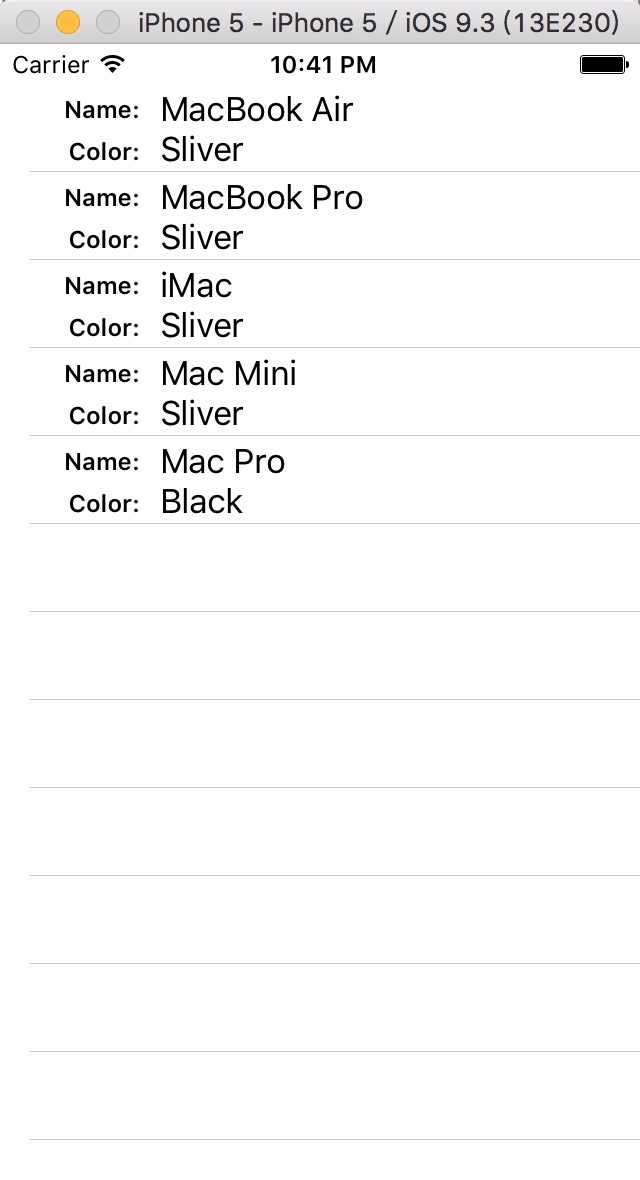
这个效果还有另外一种实现方法,就是使用storyboard,用nib实现。不过之前与一位师兄交流中得知,以后工作中用代码实现视图布局比较多,因为会解决很多问题。在这之前自己做的都是使用storyboard,虽然现在觉得使用起来会省事,但是到了开发大型的APP的时候who know,right?所以,自己还需要提升用代码实现布局的能力。
原文:http://www.cnblogs.com/jierism/p/5701883.html
【说明】:本文章由站长整理发布,文章内容不代表本站观点,如文中有侵权行为,请与本站客服联系(QQ:254677821)!