一、组网结构
nginx作为一个网关,接收外部请求,同时,因为技术选型的历史原因,内部的微服务没有服务管理。
但是微服务间调用的话,比如微服务A集群要调用微服务集群B,只好也走nginx了,通过nginx来做负载均衡。
同时,这份配置里也包含了tcp 四层负载均衡的配置。
二、nginx配置


                #user  nobody;
worker_processes
                4
                ;

#error_log  logs/error.log;
#error_log  logs/error.log  notice;
#error_log  logs/error.log  info;

#pid        logs/nginx.pid;

worker_rlimit_nofile 65535;

events {
    use epoll; #linux 服务器的优点所在
    worker_connections  65535;
}


http {
    include       mime.types;
    default_type  application/octet-stream;

    #log_format  main  ‘$remote_addr - $remote_user [$time_local] "$request" ‘
    #                  ‘$status $body_bytes_sent "$http_referer" ‘
    #                  ‘"$http_user_agent" "$http_x_forwarded_for"‘;

    #access_log  logs/access.log  main;

    sendfile        on;
    #tcp_nopush     on;

    #keepalive_timeout  0;
    keepalive_timeout  65;

    #gzip  on;

    server {
        listen 9004;

        location /igt {
            root /usr/local/nginx/webapps;
            index index.html;
        }
        location /rms {
            root /usr/local/nginx/webapps;
            index index.html;
        }
    }
    upstream 8080tomcat {
         server 10.11.12.61:8080 weight=1;
         server 10.11.12.62:8080 weight=1;
    }
    server {
        listen       8080;
        server_name  localhost;

        location / {
            root   html;
            index  index.html index.htm;
            proxy_pass http://8080tomcat;        }

        error_page   500502503504  /50x.html;
        location = /50x.html {
            root   html;
        }

    }


    upstream 9997tomcat {
         server 10.11.12.63:9997 weight=1;
         server 10.11.12.64:9997 weight=1;
    }
    server {
        listen       9997;
        server_name  localhost;

        location / {
            root   html;
            index  index.html index.htm;
            proxy_pass http://9997tomcat;        }

        error_page   500502503504  /50x.html;
        location = /50x.html {
            root   html;
        }

    }


    upstream 9996tomcat {
         server 10.11.12.63:9996 weight=1;
         server 10.11.12.64:9996 weight=1;
    }
    server {
        listen       9996;
        server_name  localhost;

        location / {
            root   html;
            index  index.html index.htm;
            proxy_pass http://9996tomcat;        }

        error_page   500502503504  /50x.html;
        location = /50x.html {
            root   html;
        }

    }


    upstream 9080tomcat {
         server 10.11.12.105:9080 weight=1;
         server 10.11.12.106:9080 weight=1;
    }
    server {
        listen       9080;
        server_name  localhost;

        location / {
            root   html;
            index  index.html index.htm;
            proxy_pass http://9080tomcat;        }

        error_page   500502503504  /50x.html;
        location = /50x.html {
            root   html;
        }

    }


    upstream 8989tomcat {
         server 10.11.12.81:8989 weight=1;
         server 10.11.12.82:8989 weight=1;
         server 10.11.12.83:8989 weight=1;
    }
    server {
        listen       8989;
        server_name  localhost;

        location / {
            root   html;
            index  index.html index.htm;
            proxy_pass http://8989tomcat;        }

        error_page   500502503504  /50x.html;
        location = /50x.html {
            root   html;
        }

    }


    upstream 9998tomcat {
         server 10.11.12.90:9998 weight=1;
         server 10.11.12.91:9998 weight=1;
    }
    server {
        listen       9998;
        server_name  localhost;

        location / {
            root   html;
            index  index.html index.htm;
            proxy_pass http://9998tomcat;        }

        error_page   500502503504  /50x.html;
        location = /50x.html {
            root   html;
        }

    }


     upstream 8040tomcat {
         server 10.11.12.61:8040 weight=1;
         server 10.11.12.62:8040 weight=1;
    }
    server {
        listen       8040;
        server_name  localhost;

        location / {
            root   html;
            index  index.html index.htm;
            proxy_pass http://8040tomcat;        }

        error_page   500502503504  /50x.html;
        location = /50x.html {
            root   html;
        }

    }
      upstream 9090httpToftp {
         server 10.11.12.70:9090 weight=1;
         server 10.11.12.115:9090 weight=1;
    }
    server {
        listen       9090;
        server_name  localhost;

        location / {
            root   html;
            index  index.html index.htm;
            proxy_pass http://9090httpToftp;        }

        error_page   500502503504  /50x.html;
        location = /50x.html {
            root   html;
        }

    }


}

 stream {

    upstream ftp20{
         hash $remote_addr consistent;
         server 10.11.12.70:20 max_fails=3 fail_timeout=30s;
         server 10.11.12.115:20 max_fails=3 fail_timeout=30s;
     }

     server {
       listen 20 so_keepalive=on;
       proxy_pass ftp20;
    }


   upstream ftp21{
        hash $remote_addr consistent;
        server 10.11.12.70:21 max_fails=3 fail_timeout=30s;
        server 10.11.12.115:21 max_fails=3 fail_timeout=30s;
    }
     server {
       listen 21 so_keepalive=on;
       proxy_pass ftp21;
    }
  }
三、keepalived 配置
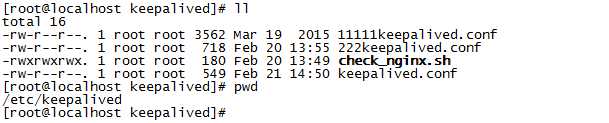
其中,keepalived.conf:
            vrrp_script chk_nginx {
 script
            "
            /etc/keepalived/check_nginx.sh
            "
            //
            检测nginx进程的脚本
 interval 2
 weight -20
}

global_defs {
 notification_email {
      //可以添加邮件提醒 }
}
vrrp_instance VI_1 {
 state MASTER //主服务器 interface eth0
 virtual_router_id 51
 mcast_src_ip 10.11.12.107
 priority 250
 advert_int 1

 authentication {
        auth_type PASS
        auth_pass 123456
 }
 track_script {
        chk_nginx
 }
 virtual_ipaddress {
        10.11.12.114
 }
}
check_nginx.sh:
#!/bin/bash

A=`ps -C nginx --no-header |wc -l`

if [ $A -eq 0 ]

thenecho‘nginx server is died‘killall keepalived #nginx服务异常,同时把keepalived服务停止。

fi
四、redis-sentinel 配置文件
一共三台机器的sentinel集群:
10.11.12.87 上的如下:
/etc/redis-sentinel.conf:
                # Example sentinel.conf

# *** IMPORTANT ***
#
# By default Sentinel will not be reachable from interfaces different than
# localhost, either use the ‘bind‘ directive to bind to a list of network
# interfaces, or disable protected mode with "protected-mode no" by
# adding it to this configuration file.
#
# Before doing that MAKE SURE the instance is protected from the outside
# world via firewalling or other means.
#
# For example you may use one of the following:
#
# bind 127.0.0.1192.168.1.1
#
protected-mode no

# port <sentinel-port>
# The port that this sentinel instance will run on
port 26379

daemonize yes
# sentinel announce-ip <ip>
# sentinel announce-port <port>
#
# The above two configuration directives are useful in environments where,
# because of NAT, Sentinel is reachable from outside via a non-local address.
#
# When announce-ip is provided, the Sentinel will claim the specified IP address
# in HELLO messages used to gossip its presence, instead of auto-detecting the
# local address as it usually does.
#
# Similarly when announce-port is provided and is valid and non-zero, Sentinel
# will announce the specified TCP port.
#
# The two options don‘t need to be used together, if only announce-ip is# provided, the Sentinel will announce the specified IP and the server port
# as specified by the "port" option. If only announce-port is provided, the
# Sentinel will announce the auto-detected local IP and the specified port.
#
# Example:
#
# sentinel announce-ip 1.2.3.4

# dir <working-directory>
# Every long running process should have a well-defined working directory.
# For Redis Sentinel to chdir to /tmp at startup is the simplest thing
# for the process to don‘t interfere with administrative tasks such as# unmounting filesystems.
dir"/tmp"

# sentinel monitor <master-name> <ip> <redis-port> <quorum>
#
# Tells Sentinel to monitor this master, and to consider it in O_DOWN
# (Objectively Down) state only if at least <quorum> sentinels agree.
#
# Note that whatever is the ODOWN quorum, a Sentinel will require to
# be elected by the majority of the known Sentinels in order to
# start a failover, so no failover can be performed in minority.
#
# Slaves are auto-discovered, so you don‘t need to specify slaves in
# any way. Sentinel itself will rewrite this configuration file adding
# the slaves using additional configuration options.
# Also note that the configuration file is rewritten when a
# slave is promoted to master.
#
# Note: master name should not include special characters or spaces.
# The valid charset is A-z 0-9 and the three characters ".-_".
sentinel myid 767b79202bef6ec5bfdb0930344d362f28583652

# sentinel auth-pass <master-name> <password>
#
# Set the password to use to authenticate with the master and slaves.
# Useful if there is a password set in the Redis instances to monitor.
#
# Note that the master password is also used for slaves, so it is not
# possible to set a different password in masters and slaves instances
# if you want to be able to monitor these instances with Sentinel.
#
# However you can have Redis instances without the authentication enabled
# mixed with Redis instances requiring the authentication (as long as the
# password set is the same for all the instances requiring the password) as
# the AUTH command will have no effect in Redis instances with authentication
# switched off.
#
# Example:
#
# sentinel auth-pass mymaster MySUPER--secret-0123passw0rd

# sentinel down-after-milliseconds <master-name> <milliseconds>
#
# Number of milliseconds the master (or any attached slave or sentinel) should
# be unreachable (as in, not acceptable reply to PING, continuously, for the
# specified period) in order to consider it in S_DOWN state (Subjectively
# Down).
#
# Default is 30 seconds.
sentinel monitor mymaster 10.11.12.8763792

# sentinel parallel-syncs <master-name> <numslaves>
#
# How many slaves we can reconfigure to point to the new slave simultaneously
# during the failover. Use a low number if you use the slaves to serve query
# to avoid that all the slaves will be unreachable at about the same
# timewhile performing the synchronization with the master.
sentinel config-epoch mymaster 0

# sentinel failover-timeout <master-name> <milliseconds>
#
# Specifies the failover timeout in milliseconds. It is used in many ways:
#
# - The time needed to re-start a failover after a previous failover was
#   already tried against the same master by a given Sentinel, is two
#   times the failover timeout.
#
# - The time needed for a slave replicating to a wrong master according
#   to a Sentinel current configuration, to be forced to replicate
#   with the right master, is exactly the failover timeout (counting since
#   the moment a Sentinel detected the misconfiguration).
#
# - The time needed to cancel a failover that is already in progress but
#   did not produced any configuration change (SLAVEOF NO ONE yet not
#   acknowledged by the promoted slave).
#
# - The maximum time a failover in progress waits for all the slaves to be
#   reconfigured as slaves of the new master. However even after this time
#   the slaves will be reconfigured by the Sentinels anyway, but not with
#   the exact parallel-syncs progression as specified.
#
# Default is 3 minutes.
sentinel leader-epoch mymaster 0

# SCRIPTS EXECUTION
#
# sentinel notification-script and sentinel reconfig-script are used in order
# to configure scripts that are called to notify the system administrator
# or to reconfigure clients after a failover. The scripts are executed
# with the following rules for error handling:
#
# If script exits with "1" the execution is retried later (up to a maximum
# number of times currently set to 10).
#
# If script exits with "2" (or an higher value) the script execution is
# not retried.
#
# If script terminates because it receives a signal the behavior is the same
# as exit code 1.
#
# A script has a maximum running time of 60 seconds. After this limit is
# reached the script is terminated with a SIGKILL and the execution retried.

# NOTIFICATION SCRIPT
#
# sentinel notification-script <master-name> <script-path>
#
# Call the specified notification script for any sentinel event that is
# generated in the WARNING level (for instance -sdown, -odown, and so forth).
# This script should notify the system administrator via email, SMS, or any
# other messaging system, that there is something wrong with the monitored
# Redis systems.
#
# The script is called with just two arguments: the first is the event type
# and the second the event description.
#
# The script must exist and be executable in order for sentinel to start if
# this option is provided.
#
# Example:
#
# sentinel notification-script mymaster /var/redis/notify.sh

# CLIENTS RECONFIGURATION SCRIPT
#
# sentinel client-reconfig-script <master-name> <script-path>
#
# When the master changed because of a failover a script can be called in
# order to perform application-specific tasks to notify the clients that the
# configuration has changed and the master is at a different address.
#
# The following arguments are passed to the script:
#
# <master-name> <role> <state> <from-ip> <from-port> <to-ip> <to-port>
#
# <state> is currently always "failover"
# <role> is either "leader" or "observer"
#
# The arguments from-ip, from-port, to-ip, to-port are used to communicate
# the old address of the master and the new address of the elected slave
# (now a master).
#
# This script should be resistant to multiple invocations.
#
# Example:
#
# sentinel client-reconfig-script mymaster /var/redis/reconfig.sh

logfile "/var/log/redis/sentinel.log"

pidfile "/var/run/sentinel.pid"
# Generated by CONFIG REWRITE
sentinel known-slave mymaster 10.11.12.896379
sentinel known-slave mymaster 10.11.12.886379
sentinel known-sentinel mymaster 10.11.12.8826379 a7fde9d174fcdedd4d212c7607886072dde6a8f1
sentinel known-sentinel mymaster 10.11.12.8926379 cb53f606fb73c6ecd33d8424dab1c1a3424c2689
sentinel current-epoch 0
88,89的不说了,照着改改就是了。网上文章也多
五、rabbit-mq相关的命令
通过history命令查询rabbit得出:
            14  vim /etc/yum.repos.d/rabbitmq-erlang.repo
   18mkdir rabbitmq
   20  cd rabbitmq/
   22yuminstall rabbitmq-server-3.7.7-1.el7.noarch.rpm
   28yuminstall rabbitmq-server-3.7.7-1.el7.noarch.rpm
   31  vim /etc/yum.repos.d/rabbitmq-erlang.repo
   38  rpm -ivh rabbitmq-server-3.6.5-1.noarch.rpm
   39  /etc/init.d/rabbitmq-server start
   40  chkconfig rabbitmq-server on
   41  rabbitmqctl add_user admin admin
   42  rabbitmqctl set_user_tags admin administrator
   43  rabbitmqctl set_permissions -p / admin ".*"".*"".*"44  rabbitmq-plugins enable rabbitmq_management
   45  /etc/init.d/rabbitmq-server restart
   49  /etc/init.d/rabbitmq-server restart
   52  ./rabbitmqctl stop
   54  ./rabbitmqctl stop
   56  ./rabbitmqctl stop
   57  rabbitmq-server -detached
   58  vim /var/lib/rabbitmq/.erlang.cookie
   69  rabbitmqctl cluster_status
   70  rabbitmqctl start_app
   71  rabbitmqctl cluster_status
   94rm -rf rabbitmq-erlang.repo
  180  rabbitmqctl cluster_status
  181  /etc/init.d/rabbitmq-server restart
  182  rabbitmqctl cluster_status
  184  rabbitmqctl cluster_status
  186  ./rabbitmqctl stop
  187  rabbitmq-server -detached
  188  rabbitmqctl cluster_status
  196  cd /var/lib/rabbitmq/mnesia
  198  rabbitmqctl forget_cluster_node rabbitmq@mq3
  199  rabbitmqctl cluster_status
  200  rabbitmqctl stop_app
  201  rabbitmqctl forget_cluster_node rabbit@mq3
  202  rabbitmqctl --offline forget_cluster_node rabbit@mq3
  203  rabbitmqctl stop_app
  204  rabbitmqctl --offline forget_cluster_node rabbit@mq3
  205  rabbitmqctl cluster_status
  206  rabbitmqctl  -n rabbit@mq01 forget_cluster_node rabbit@mq3
  207  rabbitmqctl start_app
  208  rabbitmqctl force_reset
  209  rabbitmqctl start_app
  210  rabbitmqctl cluster_status
  212  rabbitmqctl stop_app
  213  rabbitmqctl start_app
  214  rabbitmqctl cluster_status
  216  rabbitmqctl cluster_status
  217  rabbitmqctl add_user admin admin
  223  rabbitmqctl set_policy -p EXTERNAL  ha-all "^"‘{"ha-mode":"all"}‘224  rabbitmqctl cluster_status
  274  cd rabbitmq
  277  /etc/init.d/rabbitmq-server start
  284find / -name rabbitmqctl
  285ps -ef|grep rabbitmq
  287  ./rabbitmqctl stop_app
  288  rabbitmqctl stop_app
  289  rabbitmqctl start_app
  299  ./rabbitmqctl stop_app/usr/local/HAProxy/sbin/haproxy -f /usr/local/HAProxy/conf/haproxy.cfg
  312ps -ef|grep rabbitmq
  317  history|grep rabbit
六、ftp配置
[root@localhost ~]# history | grepftp28  rpm -qa |grep vsftpd
   29yuminstall vsftpd -y
   31  service vsftpd start
   32ps -ef | grep vsftpd
   47  service vsftpd start
   70vi /etc/vsftpd/vsftpd.conf
   74  /etc/init.d/vsftpd restart
   76  cd /etc/vsftpd/
   77  sestatus -b | grepftp79  getsebool -a | grepftp86modprobe ip_nat_ftp
   89  vim /etc/vsftpd/vsftpd.conf
   90  service vsftpd restart
  102  getsebool -a | grepftp103  setsebool -P allow_ftpd_anon_write on
  104  setsebool -P allow_ftpd_full_access on
  124  getsebool -a | grepftp125  cd /etc/vsftpd/
  127vi vsftpd.conf
  129  sestatus -b | grepftp130  service vsftpd restart
  134vi /etc/vsftpd/vsftpd.conf
  135  service vsftpd restart
  136vi /etc/vsftpd/vsftpd.conf
  137  service vsftpd restart
  143  service vsftpd start
  146  history | grepftp147  vim /etc/vsftpd/vsftpd.conf
  148  history | grepftp
vsftpd.conf:
# Example config file /etc/vsftpd/vsftpd.conf
#
# The default compiled in settings are fairly paranoid. This sample file
# loosens things up a bit, to make the ftp daemon more usable.
# Please see vsftpd.conf.5for all compiled in defaults.
#
# READ THIS: This example file is NOT an exhaustive list of vsftpd options.
# Please read the vsftpd.conf.5 manual page to get a full idea of vsftpd‘s# capabilities.
#

# Allow anonymous FTP? (Beware - allowed by default if you comment this out).
pasv_promiscuous=YES
anonymous_enable=YES
#
# Uncomment this to allow local users to log in.
local_enable=YES
#
# Uncomment this to enable any form of FTP write command.
write_enable=YES
#
# Default umask for local users is 077. You may wish to change this to 022,
# if your users expect that (022 is used by most other ftpd‘s)
local_umask=022
#
# Uncomment this to allow the anonymous FTP user to upload files. This only
# has an effect if the above global write enable is activated. Also, you will
# obviously need to create a directory writable by the FTP user.
anon_upload_enable=YES
#
# Uncomment this if you want the anonymous FTP user to be able to create
# new directories.
anon_mkdir_write_enable=YES
anon_other_write_enable=YES
# Activate directory messages - messages given to remote users when they
# go into a certain directory.
dirmessage_enable=YES
#
# The target log file can be vsftpd_log_file or xferlog_file.
# This depends on setting xferlog_std_format parameter
xferlog_enable=YES
#
# Make sure PORT transfer connections originate from port 20 (ftp-data).
connect_from_port_20=YES
#
# If you want, you can arrange for uploaded anonymous files to be owned by
# a different user. Note! Using "root"for uploaded files is not
# recommended!
#chown_uploads=YES
#chown_username=whoever
#
# The name of log file when xferlog_enable=YES and xferlog_std_format=YES
# WARNING - changing this filename affects /etc/logrotate.d/vsftpd.log
#xferlog_file=/var/log/xferlog
#
# Switches between logging into vsftpd_log_file and xferlog_file files.
# NO writes to vsftpd_log_file, YES to xferlog_file
xferlog_std_format=YES
#
# You may change the default value for timing out an idle session.
#idle_session_timeout=600
#
# You may change the default value for timing out a data connection.
#data_connection_timeout=120
#
# It is recommended that you define on your system a unique user which the
# ftp server can use as a totally isolated and unprivileged user.
#nopriv_user=ftpsecure
#
# Enable this and the server will recognise asynchronous ABOR requests. Not
# recommended for security (the code is non-trivial). Not enabling it,
# however, may confuse older FTP clients.
#async_abor_enable=YES
#
# By default the server will pretend to allow ASCII mode but in fact ignore
# the request. Turn on the below options to have the server actually do ASCII
# mangling on files when in ASCII mode.
# Beware that on some FTP servers, ASCII support allows a denial of service
# attack (DoS) via the command "SIZE /big/file"in ASCII mode. vsftpd
# predicted this attack and has always been safe, reporting the size of the
# raw file.
# ASCII mangling is a horrible feature of the protocol.
#ascii_upload_enable=YES
#ascii_download_enable=YES
#
# You may fully customise the login banner string:
#ftpd_banner=Welcome to blah FTP service.
#
# You may specify a file of disallowed anonymous e-mail addresses. Apparently
# useful for combatting certain DoS attacks.
#deny_email_enable=YES
# (default follows)
#banned_email_file=/etc/vsftpd/banned_emails
#
# You may specify an explicit list of local users to chroot() to their home
# directory. If chroot_local_user is YES, then this list becomes a list of
# users to NOT chroot().
#chroot_local_user=YES
#chroot_list_enable=YES
# (default follows)
#chroot_list_file=/etc/vsftpd/chroot_list
#
# You may activate the "-R" option to the builtin ls. This is disabled by
# default to avoid remote users being able to cause excessive I/O on large
# sites. However, some broken FTP clients such as "ncftp" and "mirror" assume
# the presence of the "-R" option, so there is a strong casefor enabling it.
#ls_recurse_enable=YES
#
# When "listen" directive is enabled, vsftpd runs in standalone mode and
# listens on IPv4 sockets. This directive cannot be used in conjunction
# with the listen_ipv6 directive.
listen=YES
#
# This directive enables listening on IPv6 sockets. To listen on IPv4 and IPv6
# sockets, you must run two copies of vsftpd with two configuration files.
# Make sure, that one of the listen options is commented !!
#listen_ipv6=YES

pam_service_name=vsftpd
userlist_enable=YES
tcp_wrappers=YES
anon_root=/home/ROOT
no_anon_password=YES
local_root=/home/ROOT
ftp_username=ROOT
原文:https://www.cnblogs.com/grey-wolf/p/10836384.html
【说明】:本文章由站长整理发布,文章内容不代表本站观点,如文中有侵权行为,请与本站客服联系(QQ:254677821)!